MATERIALS/TOOLS NEEDED

1) Shingle Hatcher - or Hammer. Pnuematic hammers that are cushioned to seat the nail, rather than drive it, are acceptable.

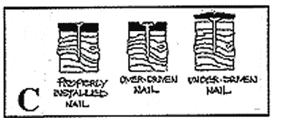
2) Nails - 11 ga or 6 d 1/2" flat head galvanized, stainless steel or copper roofing nails with wide flat heads of sufficient length (2 x thickness + 1") to penetrate the sheathing the full thickness and/or the overlapping shingles. Nails should be driven flush with the surface, but not over driven. See diagram C.

3) Diamond blade saw is needed to cut custom fit shingles.

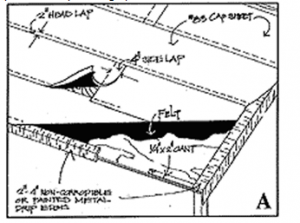
4) Elastic cement needed to glue hip and ridge, should be waterproof, heat resistant and freeze resistant.

5) Silicone sealer if desired to seal hip/ridge.

UNDERLAYMENT

1.     Underlayment - Decking For roofs less than 3:12 pitch: Slate/Select is not designed for roof slopes under 3:12. It may be used for decorative purposes only when installed on solid sheathing, provided a complete built-up roofing system is installed and the assembly is specifically approved by local building codes.

All other roofs: Use FULL plywood decking, not slats. Decking should be a minimum of1/2" thick CDX. Install a metal drip edge at eaves. See diagram A.

Underlayment - Felt Class A fire rating requirements: 1 layer #30 lb. felt applied first and 1 layer #83 fiberglass cap sheet/roll roofing. Class B fire rating requirements: 2 layers #30 lb. felt. Application should have a 2" headlap, 4" sidelap. Extra underlayment should be used at hip and ridge. (See Hip/Ridge Installation.) Felt should be omitted under metals unless copper is used. Ice shield can be used as an acceptable qualified substitute to 2 layers of 30# felt. Please verify.

2.      Flashing & Snow Guards Cold weather flashing and snow guards should be used with 2 layers of underlayment or asphalt membrane in extremely cold climates to avoid water leaking from melting snow. Any roof can be damaged due to ice and snow buildup. A cold roof design is recommended where these conditions exist. Consult your roofer and local building codes.

BLENDING OF COLORS AND SIZES

Blending is very subjective. The only rule is to make sure the size and colors are "shuffled" using a small portion from each pallet of each size and color to blend. Color shuffling will be more visible to the eye and thus more important. Proposals give you a blending report to assist you.

MARK LINES

Mark lines with chalk as shown in the drawing. Only two vertical lines are necessary, but more intermediate lines are suggested at 12" intervals to serve as guidelines. Horizontal lines are marked at the following intervals allowing for 1/2" - 1" overhang: 1st row @ 6 1/2", 2nd row @ 7", 3rd+rows @ 7 1/2". Upon reaching closer to the ridge, 8-10", readjust the overlap slightly to accommodate final slate proportionately. See diagram B.

NAILS

Fasten each shingle with two nails. The length of the nail should penetrate the sheathing by 3/4". Drive the nail till the head nearly touches the surface of the shingle. Do not overnail. In areas where wind uplift is a consideration, Slate/Select can be additionally nailed to meet code requirements. See your local building codes for specifics. See diagram C.

STARTER SHINGLES

Starter shingles merely serve as a base and are applied as shown, flush with the eave line. A 9" starter shingle is used and applied horizontally as shown in detail in DIAGRAM D.

APPLYING FIELD SHAKES

First Course: Start the first course with a full shingle using the blending method. Apply directly over the starter shingle allowing 1/2"-1" overhang.

Second Course: Start the second course with a half shingle, sawn side in.

Third Course: Return to the full shingle application, continuing to shuffle colors and sizes. There must always be a maximum of a 7 1/2" exposure and a 3" minimum overlap (except on the first course which will have a 6 1/2" exposure).

Final Course: Approximately 8"-10" from the top of the roof (allowing 2" from ridge), remeasure and make minor adjustments in exposure (always 7 1/2" or less - never more) to accommodate the final courses proportionately. See diagram D.

**Due to the varying width of shingles, staggered butt application is not necessary to achieve a layered look. Please note staggered butt application can require 10-15% more material as well as additional weight, which would require more structural support.

RIDGE INSTALLATION

This is done using the saddle ridge method as shown in diagrams E and F.

Step 1: Apply additional 6"-8" wide felt with cement over ridge.

Step 2:Apply ridge on one side with prevailing wind direction. Use elastic cement to initially secure and then use 2 nails per shingle.

Step 3: Install second side overlapping exposed area.

Step 4:A typical saddle ridge exposure is 11-12"

Step 5:Double at ends.

Step 6:Seal top joints with elastic cement.

We recommend 7" of "Weatherguard" strip underneath the ridge cap.

HIP INSTALLATION

Step 1: Apply extra felt strip over hip as with the ridge.

Step 2: Cut the hip edge angles as needed to align with the field shingles.

Step 3: Double at the eaves.

Step 4: Use the same cement/nailing application as noted with the ridge. See diagram G.

THE EXPOSURE FOR THE HIP AND RIDGE is 11".

VALLEY FLASHING

    1. Run underlayment under valley sheathing.
    2. Run valley flashing, a non-corrodible metal with CRIMPED edge. A crimped edge is essential to prevent leaks from melted snow and ice. Minimum width should be 20"
    3. Cut valley pieces from field shakes at needed angles.
    4. Use 2 nails per slate or partial slate, keeping fasteners as far away as possible from flashing. See diagram H.

CHIMNEY FLASHING

    1. Use 26" galvanized flashing around chimney, allow 1" clearance around base.
    2. Apply upper slate over flashing.
    3. Allow base flashing to cover down slate courses. See diagram I.


Our staff of experienced detailers can help you with your design, dimensions and installation. If you have any questions, please feel free to contact us at:

TOP